 After using the Big Shot & Fancy Favor bigz xl die, score on dotted lines, then place on sticky strip. Hint: If you are going to do any stamping do it before you fold the box together! Adhere box.
Cut (2) 1 1/2" x 12" pieces of Designer Series Paper. Place sticky strip on the side you want facing out. This is for your "tissue paper"!

Adhere first strip to the inside of the fancy favor, starting on one of the sides of the favor bag. Sticky strip should be just below the top of the bag. Hint: before you adhere the Designer Series Paper decide which part of the DSP you want to be in the front!

As you make the "tissue paper" you want to pinch the paper where the sticky strip is adhering to the favor bag. The top of the "tissue paper" should be soft ripples.

This is your first strip finished. Notice they are not even, this does not have to be perfect. Now start your second strip where your first one ended and continue to where the first strip started.
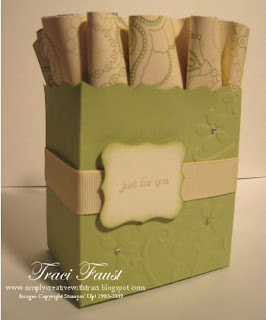
Next decorate your Fancy Favor Bag!
How perfect for a party favor!

Sponging the edges makes such a difference!
Supplies:
Stamp Set: Teeny Tiny Wishes
Ink: Certainly Celery
Paper: Certainly Celery, Very Vanilla, Shades of Spring (Occasions Mini Catalog Jan 5-April 30)
Extras: Very Vanilla 5/8" Grosgrain Ribbon, Curly Label punch, Big Shot, Fancy Favor bigz xl die, Elegant Bouquet Textured Impressions Embossing Folder, rhinestones from Eggcellent Eggs Kit (Occasions Mini)










Hi there... New follower here! I'm so glad you did a little tutorial on this. I tried adding the 'flair' to my fancy favor box, and it did not work out for me! I will definitely be trying it your way. =)
ReplyDeleteWould love for you to follow me
http://www.stampwab.com